Old bathroom tile has a way of making the whole room feel dirty, even when it is clean. If your walls or surround are stained, faded, chipped, or stuck in a color from 1987, learning how to resurface bathroom tile can save you from a full tear-out.
For a lot of homeowners, replacement sounds like the only real fix. It is not. Tile resurfacing can give you a clean, updated finish without demolition, days of mess, or the cost of rebuilding the bathroom around it. The catch is simple. The result depends on prep, materials, and technique. Cut corners, and it shows fast.
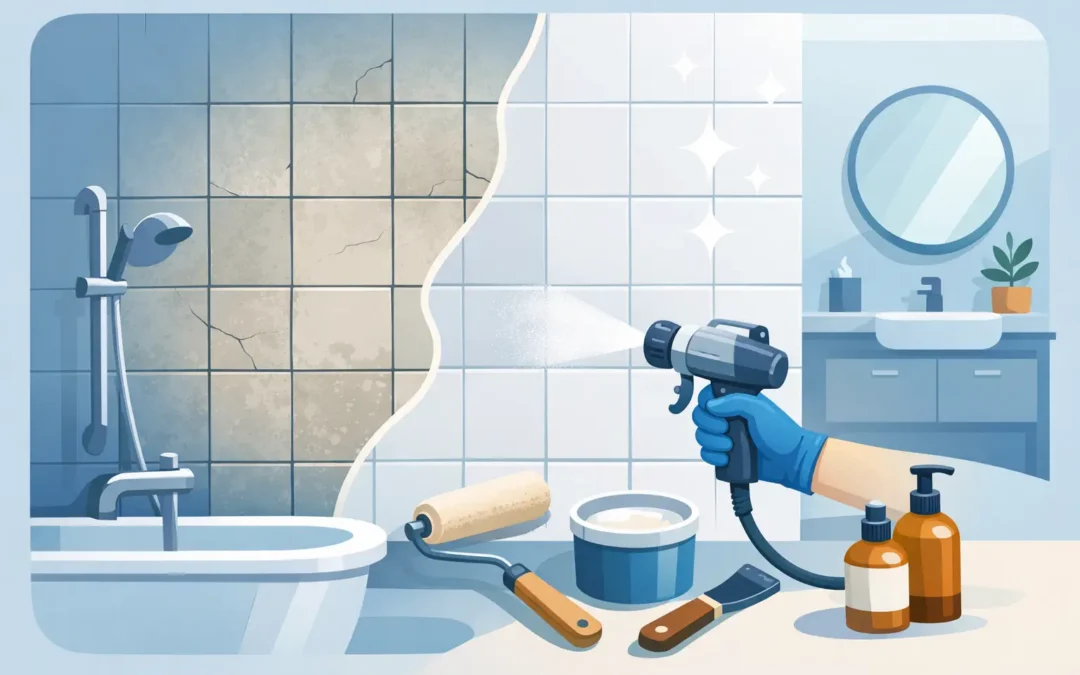
What bathroom tile resurfacing actually is
Resurfacing bathroom tile means cleaning, repairing, bonding, and coating the existing tile so it looks new again. This is not the same as painting tile with a basic off-the-shelf wall paint. Real resurfacing uses specialty coatings designed to bond to slick, non-porous surfaces in wet areas.
Done correctly, resurfacing can cover outdated colors, minor chips, worn glaze, and surface stains that never seem to come out. It can also change the look of the bathroom fast. White is a common choice, but color updates are possible depending on the product and the condition of the surface.
This works best when the tile is structurally sound. If tiles are loose, water has gotten behind the wall, or the substrate is failing, resurfacing is the wrong fix. In that case, replacement is the honest answer.
How to resurface bathroom tile step by step
If you want to understand how to resurface bathroom tile, start with the part most people rush through – prep. The coating is only as good as the surface under it.
Step 1: Clean every inch of the tile
Bathrooms collect soap scum, body oils, hard water buildup, mildew, and residue from cleaning products. Any of that can interfere with adhesion. The tile needs to be deep-cleaned, not just wiped down.
That usually means using a heavy-duty cleaner or degreaser, followed by rinsing and drying. In Florida bathrooms, humidity can make this step more important than homeowners expect. Moisture trapped in grout lines or corners can cause problems later.
Step 2: Remove caulk and address damage
Loose or old caulk has to come out. Chips, cracks, and damaged grout should be repaired before coating begins. Resurfacing can improve appearance, but it will not hide every structural problem.
This is where a lot of DIY jobs start falling apart. People assume the coating will fill defects. It will not. Surface damage needs proper repair if you want a smooth finish.
Step 3: Etch or sand the surface
Glossy tile does not naturally welcome new coatings. The surface has to be dulled and prepared so the bonding products can do their job. Depending on the system, that may involve chemical etching, sanding, or both.
This is not a cosmetic step. It is what helps the finish stick instead of peeling.
Step 4: Apply bonding agents and primer
Professional systems often include an adhesive promoter or primer made for tile and other slick bathroom surfaces. This creates the bridge between the old tile and the new finish.
Skip this, use the wrong product, or apply it unevenly, and durability drops fast. Bathrooms are hard on coatings. Steam, cleaning products, and daily use expose weak prep in a hurry.
Step 5: Spray or apply the topcoat
The final coating is what gives the tile its fresh, uniform look. Professional refinishers usually spray the coating because it lays down smoother and more evenly than most brush or roller applications.
A sprayed finish tends to look more like factory glaze. Brush marks and roller texture are the biggest giveaway in many DIY tile refinishing jobs.
Step 6: Cure before using the bathroom
Dry and cured are not the same thing. The surface may feel dry long before it is ready for regular use. Cure time depends on the coating system, humidity, and ventilation.
Using the shower too soon is one of the fastest ways to damage a fresh finish. Patience matters here.
Can you do it yourself?
Yes, technically. But whether you should is a different question.
DIY tile resurfacing kits exist, and some homeowners use them for low-traffic areas or quick cosmetic updates. If you are resurfacing a powder room backsplash, that is one thing. If you are dealing with a full tub surround or shower walls that see daily moisture, the margin for error gets small.
The biggest DIY problems are poor cleaning, weak surface prep, uneven coating, and choosing products that are not built for wet environments. Ventilation is another issue. Many refinishing products have strong fumes and need careful handling.
That does not mean every DIY job fails. It means the risk is real. If you want the job to hold up in a working bathroom, professional resurfacing usually delivers a better finish and a longer life.
When resurfacing makes sense and when it does not
Resurfacing is a strong option when the tile is ugly but still solid. If the color is dated, the glaze is worn, or the surface has minor cosmetic damage, refinishing can be a smart move.
It also makes sense when you want to avoid demolition. That matters if you do not want to disturb surrounding walls, flooring, vanities, or plumbing. For many homeowners, the best part is keeping the project simple.
But there are limits. Resurfacing is not a fix for major cracks, loose tile, mold behind walls, soft backer board, or water damage. It is also not the right call if you are changing the bathroom layout or doing a full remodel anyway.
A good contractor will tell you when refinishing is the right fit and when it is not. That matters more than a sales pitch.
How long does resurfaced bathroom tile last?
It depends on the condition of the original tile, the coating system used, and how well the surface is maintained. A professionally resurfaced tile surround can last for years when the prep is done right and the finish is cared for properly.
Maintenance is simple, but it matters. Use non-abrasive cleaners. Avoid harsh scrubbing pads. Keep the surface clean so soap scum and mineral buildup do not sit on it for months. If caulk needs touch-up later, handle it before water gets where it should not.
This is one reason homeowners often prefer a company that stands behind the work. A real warranty tells you they expect the finish to last.
Cost vs. replacement
This is usually where resurfacing wins people over. Full tile replacement is not just the cost of new tile. It often includes demolition, disposal, backer board work, waterproofing, installation, grout, and repairs to anything disturbed during removal.
Resurfacing avoids most of that. You keep the existing tile in place and restore the surface instead of rebuilding the bathroom from the studs out. For homeowners who want a dramatic visual upgrade without a major renovation bill, that is the appeal.
The lowest price should not be the only factor, though. Cheap resurfacing jobs can fail early. If the finish peels, chips, or discolors, you are paying twice.
Hiring a pro for bathroom tile resurfacing
If you are comparing options, ask direct questions. What prep do they do before coating? Do they repair chips and grout issues? What products do they use on wet-area tile? How long is the surface expected to last? Is there a warranty if something goes wrong?
Those answers tell you a lot. So do before-and-after photos and reviews from actual local homeowners.
A company like The Tub Guy focuses on resurfacing because the work is technical. The difference between a finish that lasts and one that fails usually comes down to experience, prep discipline, and standing behind the job after it is done.
The bottom line on how to resurface bathroom tile
If your bathroom tile is worn out but still solid, resurfacing can be the practical fix. You get a cleaner look, a faster turnaround, and a lower cost than replacement. But the process is not magic. The quality comes from the prep, the coating system, and the person doing the work.
If you want it to look better for a month, there are shortcuts. If you want it to hold up, do it the right way the first time. That is usually the cheapest path in the long run.