A stained, chipped, or faded tub can make the whole bathroom look worn out. If you’re wondering how to refinish a bathtub, the short answer is this: surface prep is everything, coating choice matters, and the final result depends on how well each step is done.
For some homeowners, bathtub refinishing is a smart DIY project. For others, it turns into a messy weekend, a strong odor problem, and a finish that starts peeling far too soon. The difference usually comes down to the condition of the tub, the products used, and how much margin for error you really have.
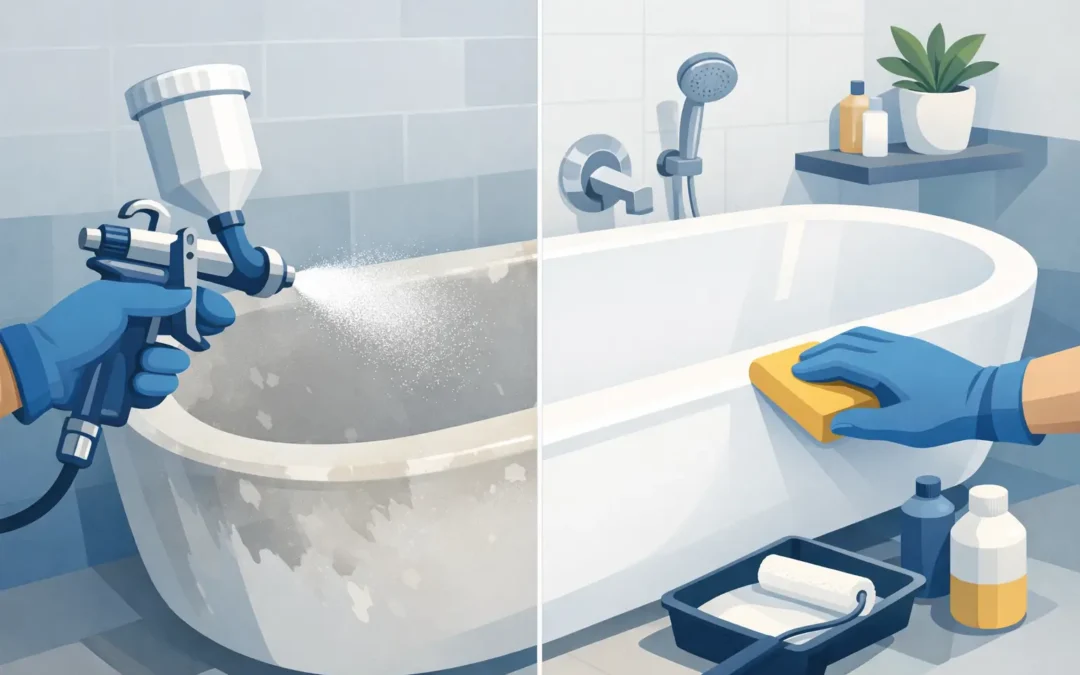
How to refinish a bathtub step by step
Refinishing a bathtub means restoring the surface instead of tearing the tub out and replacing it. Done right, it can improve the look of the tub, change the color, and cover years of wear for a fraction of replacement cost.
The basic process sounds simple. Clean it, sand it, repair damage, apply bonding products, then spray or roll on a new topcoat. In real life, each of those steps has to be done carefully. Skip one, rush one, or use the wrong material, and the finish may not last.
Start with a hard look at the tub
Before you buy anything, check what you’re working with. A tub with light staining, minor scratches, and surface dullness is a much better refinishing candidate than one with major structural cracks, movement, or widespread rust damage.
Porcelain, fiberglass, and cultured marble all behave differently. Older cast iron tubs are often great candidates for refinishing because they are solid and worth saving. A flimsy fiberglass tub with deep flexing may need more than a new coating. If the tub shifts underfoot, that problem needs to be fixed first.
Clean beyond what looks clean
This is the part DIY jobs often get wrong. A bathtub surface can look clean and still have soap scum, body oils, silicone residue, hard water minerals, or old cleaner buildup on it.
That contamination gets between the tub and the new coating. When that happens, adhesion suffers. The new finish may fish-eye, bubble, or peel.
Use a strong cleaner made for heavy buildup. Remove every trace of caulk around the tub. If silicone is left behind, the new finish may fail along the edges. Rinse well and let the surface dry fully before moving on.
Sand, etch, and create a surface the coating can grip
Most tubs need mechanical abrasion so the next layer can bond. That usually means sanding the entire surface evenly. Some refinishing systems also use an acid etch, especially on porcelain or ceramic surfaces, to help create a better profile for adhesion.
This step is not about making the tub look pretty. It is about giving the coating something to bite into. Glossy areas, missed spots, and uneven sanding can all cause trouble later.
After sanding or etching, the tub has to be cleaned again. Dust, residue, and moisture all need to go.
Repair chips, pits, and worn areas
A new finish will not hide bad surface defects. Chips, small gouges, rust spots, and pitted areas usually need filler or repair compound before the final coating goes on.
These repairs have to be feathered smooth. If not, you will see and feel them through the finished surface. This is one reason professional work tends to look better. It is not just the coating. It is the prep work under it.
Prime and topcoat with the right system
Not all bathtub refinishing products are equal. Hardware store kits can work for minor cosmetic improvement, but they are usually not the same as the coatings used in professional reglazing.
A quality system often includes a bonding primer and a durable topcoat designed for wet, high-use environments. Many pros spray the finish because it lays down more evenly and creates a smoother surface. DIY kits often rely on brushing or rolling, which can leave texture, lap marks, or weak spots.
Ventilation matters here too. Refinishing products can produce strong fumes. That means proper masking, air movement, and safety gear are not optional.
Let it cure fully
Dry to the touch is not the same as cured. A tub may look ready long before it can handle regular use. If you use it too early, the finish can mark, dull, or fail.
Follow the coating manufacturer’s cure times exactly. Keep the room ventilated. Do not recaulk too soon unless the system calls for it at a specific stage.
Why bathtub refinishing fails
Most failed jobs come back to prep, product quality, or application conditions. The tub was not fully cleaned. Silicone was left behind. The surface stayed damp. The coating was too thin, too thick, or applied in the wrong temperature and humidity.
Florida homeowners should pay close attention to that last point. Heat and humidity affect dry times and finish performance. If conditions are off, the coating may not level properly or cure the way it should.
Another common issue is using the wrong cleaner after the job is done. Harsh abrasives, bleach-heavy products, suction cup mats, and rough scrubbing tools can shorten the life of a refinished surface.
DIY vs. professional refinishing
If you are trying to decide whether to do it yourself or hire it out, be honest about the goal. If you just want to make an old tub look a little better for now, a DIY kit may be enough. If you want a smooth, durable, like-new result that holds up, professional refinishing is usually the better move.
Replacement costs more than most people expect once demolition, plumbing, tile work, haul-away, and repair work are added in. Refinishing avoids most of that mess. It is faster, less disruptive, and far more budget-friendly when the tub itself is still worth saving.
That said, professional refinishing is not just paying someone to spray paint a tub. You are paying for prep, repair, product knowledge, controlled application, and accountability if something needs attention later.
When hiring a pro makes more sense
Some tubs are poor candidates for a first-time DIY attempt. If the tub has heavy staining, rust, chips, peeling from an old failed coating, or the bathroom needs a color change that has to look clean and even, hiring a specialist is usually the safer call.
It also makes sense if the bathroom is your main one. A failed DIY tub can take the room out of service longer than planned. A pro can usually get the work done more efficiently and give you clear instructions on cure time and care.
Warranty matters too. A company that stands behind the work takes a big part of the risk off your shoulders. That reassurance matters when you want the job done once and done right.
How to keep a refinished bathtub looking good
Once the tub is refinished, maintenance is simple but important. Use non-abrasive cleaners. Clean it regularly so soap scum does not build up. Avoid bath mats with suction cups unless the refinisher says they are safe for that surface.
Do not leave bottles, soap bars, or metal cans sitting on the tub edge or floor for long periods. Standing moisture and trapped residue can stain or wear the finish over time. Treat it more like a finished surface than raw porcelain.
If caulk starts to fail, address it early. Water getting where it should not go can create bigger problems than surface wear.
The real question is not just how to refinish a bathtub
The real question is whether you want a quick patch or a result that lasts. Bathtub refinishing can absolutely be a smart alternative to replacement. It saves money. It avoids demolition. It can make an old bathroom look dramatically better without turning your house into a construction zone.
But the quality of the outcome depends on the details. Prep. Repairs. Product choice. Application. Cure time. Ongoing care. That is why some tubs look great for years and others start failing almost right away.
If your tub is solid but ugly, refinishing is often the right answer. And if you want the best odds of a durable finish, clean lines, and a surface that looks right from day one, this is one of those home projects where skilled workmanship goes a long way. Companies like The Tub Guy have built their reputation on exactly that kind of result.
A worn bathtub does not always need to be ripped out. Sometimes it just needs the right hands on it.